Your storefront is the first thing customers see. A clean, personalized storefront builds trust and makes people far more likely to place an order.
Bakerkit gives you a full set of tools to make your storefront look like yours, with no design experience needed. Here's how to set it up.
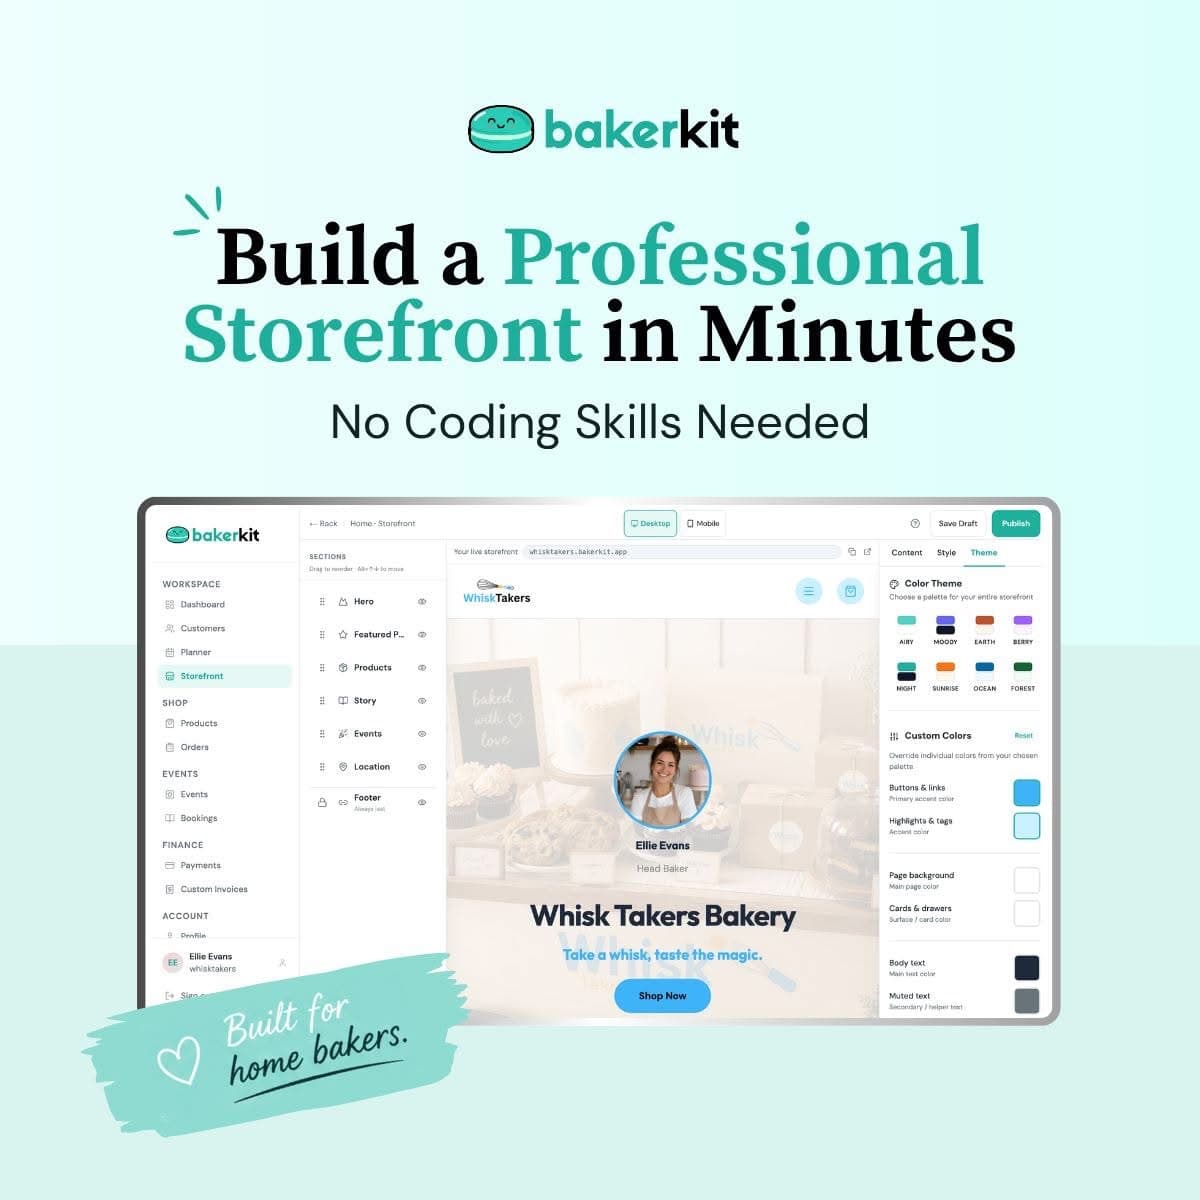
Where to Find Your Storefront Settings
From your dashboard, head to Storefront. You'll see three quick-setting cards at the top, and a button to open the full Storefront Builder below.
The quick cards handle your logo, open/closed status, and announcement banner. The builder is where you go deeper on layout, colors, fonts, and content.
Step 1: Upload Your Logo
In the Branding card, click Upload Logo and choose your image. PNG, JPG, WebP, and GIF are all supported, up to 2 MB.
Once uploaded, use the logo size slider to adjust how large it appears in your storefront header. Anywhere between 40px and 400px. Most bakers find something in the 80-120px range looks clean.
Step 2: Set Your Storefront Status
The Storefront Status card controls whether customers can place orders.
- Open: Customers can browse and order.
- Closed: Customers can still see your products but cannot check out.
If you close your storefront, add a closed message to let customers know when you'll be back. Something like "Closed for the holidays, reopening January 6th" goes a long way.
Step 3: Add an Announcement Banner
The Announcement Banner card lets you pin a short message to the top of your storefront. Great for holiday pre-orders, new menu drops, or pickup schedule changes.
Turn the toggle on, pick a style, and write your message (up to 160 characters).
Three styles are available:
- Info - Light teal, good for general updates
- Warning - Light orange, good for important notices
- Promo - Dark teal with white text, great for promotions
Step 4: Open the Storefront Builder
Click Open Builder to open the full customization editor. You'll see three panels:
- Left: Your sections list
- Center: A live preview of your storefront
- Right: The editor for the selected section
The preview updates in real time as you make changes. You can also switch between desktop and mobile views at the top to check how things look on both.
Step 5: Customize Your Sections
Your storefront is made up of sections. You have seven available:
- Hero - The banner at the top of your storefront
- Featured Product - A spotlight section for one product
- Products - Your full product grid
- Story - A space to tell your bakery's story
- Events - For workshops or pop-ups
- Location - Your address and opening hours
- Footer - Always at the bottom
Showing and hiding sections: Click the eye icon next to any section to show or hide it. Only show what's relevant to your business. If you don't run events, hide it.
Reordering sections: Drag and drop sections into whatever order makes sense for your storefront. The footer always stays at the bottom.
Click any section to edit its content and style in the right panel.
Step 6: Set Up Your Hero
The hero is the first thing visitors see. Click Hero in the left panel to edit it.
Under Content, you can set:
- Headline - Your main message, e.g. "Handcrafted Cakes for Every Occasion"
- Tagline - A short supporting line below the headline
- CTA Button Text - The label on your call to action, e.g. "Shop Now"
- Background Image - An optional photo behind the hero text
- Baker Portrait - A photo of you, your name, and your title
Under Style, you can adjust:
- Hero Height - Compact, Standard, or Tall
- Portrait Position - Left or right of the headline
- Background Image Opacity - How prominent the background image is
Step 7: Customize Your Products Section
Click Products to edit how your menu displays.
Under Content, you can update the section title and subtitle, and toggle on or off things like dietary tags, badges, and order date information on each product card.
Under Style, choose:
- Layout - Grid or List
- Columns - 1, 2, 3, or 4 columns
- Card Style - Photo, Polaroid, or Minimal
- Card Size - Compact, Regular, or Large
Play around until it looks right. The live preview makes it easy to see what works.
Step 8: Tell Your Story
The Story section is a great place to share a little about yourself and why you bake. It doesn't need to be long. A couple of sentences and a quote can go a long way.
Under Content, add:
- A heading - e.g. "Made with love since 2019"
- Your story - A short paragraph or two
- A pull quote - A line that captures what your bakery is about
Under Style, choose between Text + Quote, Text Only, or Full Width layouts.
Step 9: Add Your Location
If customers pick up orders from you, fill in the Location section with your address and opening hours. This tells customers exactly where to go and when.
If you don't have a fixed pickup location, just hide this section.
Step 10: Pick Your Colors and Fonts
Click any section and head to the Theme tab in the right panel to set your global colors and fonts.
Colors: Choose from 8 pre-built palettes (Airy, Moody, Earth, Berry, Night, Sunrise, Ocean, Forest). If you want to go further, you can customize individual colors on top of any palette.
Fonts: Pick a heading font and a body font from 15 Google Font options. Not sure what looks good together? Use the Quick Combos to apply pre-matched font pairs in one click.
Step 11: Save and Publish
When you're happy with how things look, hit Publish in the top right. Your changes go live instantly.
If you want to keep working and come back later, use Save to save a draft without publishing.
Your Storefront, Your Brand
A well set up storefront does a lot of the selling for you. It shows customers you're serious, makes ordering feel easy, and gives your bakery a home on the internet that's actually yours.
Ready to start customizing? Log in to your Bakerkit dashboard and head to Storefront.
Go to your storefront settings →
Frequently Asked Questions
Can I change my colors and fonts after publishing? Yes. You can go back into the builder and make changes any time. Just hit Publish again when you're done.
Do I need to fill in every section? No. Hide any section you don't need. A clean storefront with fewer sections often looks better than one that's packed with empty placeholders.
Can customers see my storefront while I'm still editing? Only published changes are visible to customers. Saving a draft does not update your live storefront.
How do I add products to my storefront? Products are managed separately under Dashboard → Products. Once added there, they appear automatically in your Products section.
Bakerkit - Bakery management software built for bakers, by people who get it.